[ad#singlepage]
Many people already know the importance of backup. Your data can become corrupted; your hard drive could crash; you could have accidentally deleted a file. If you’re not, start doing it before it’s too late. There are many ways to backup your data such as burning to DVD or copying files to a USB external drive. These methods are fine but they have a few disadvantages. First of all these methods rely on physical hardware, which typically reside near the computer being backed up. This hardware can fail as well. If for instance your house were to catch fire then your data and the backups are in jeopardy. You could leave a copy of your backups at a friend’s house or a safety deposit box and at least you would have secured the backup media in case of a disaster. But that still requires you to physically bring the media to another location.
Enter the online backups. Companies like Mozy and Carbonite provide online backups over the internet. The tutorial here will help you setup your own online backup to another server over the internet so your data will be easily recoverable in the event of a disaster.
You need a:
- FTP Server ( Filezilla Server for Windows Users)
- Server or workstation with internet access
- Enough storage to hold your data
- Areca Backup ( Open Source backup software)
- Domain or DynDNS address
- Reasonably fast Internet Connection (Cable / DSL / FiOS)
Set up:
Install the FTP server:
FTP is a cross platform application that is easy to setup and manage and is a standard protocol used heavily on the internet for transferring data.
Create directory where you want to backup your data to on a large enough hard drive on a server or workstation.
- Run the Filezilla Server setup
- Create an FTP user account / Password

Set a password for the user

Add a home directory. This will be where the data backup are stored.

Verify FTP works by using an FTP client to connect to the FTP server using the account that was just setup to confirm that FTP and the user account is working properly.
Setup Port forwarding:
- DynDNS
- Router Port forward 21
- Test Connectivity from remote
- Verify FTP works
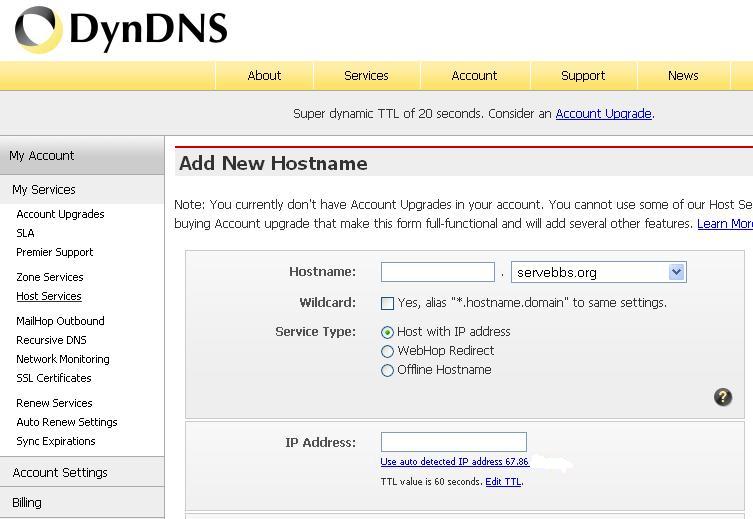
Get a dynamic DNS Name if you don’t have a static IP.
- Now to get to your computer you can use the IP the ISP has assigned you. Problem: Your ISP will more than likely use DHCP to assign you an IP so at any given time you may not know your current IP. Solution: Dynamic DNS! Go to http://dyndns.org or http://tzo.com or http://deerfield.com or any other dynamic DNS site. In this example, I use DynDNS.org.
- Sign up for an account (free) and create a host name that you will use to reference you computer. Ex. homepc.homeip.net (one of the several subnets available).Create a new host entry under Host Services. The site will automatically detect the IP that you are currently accessing the site from so sign in from the place you want to connect to. I.e. your house.

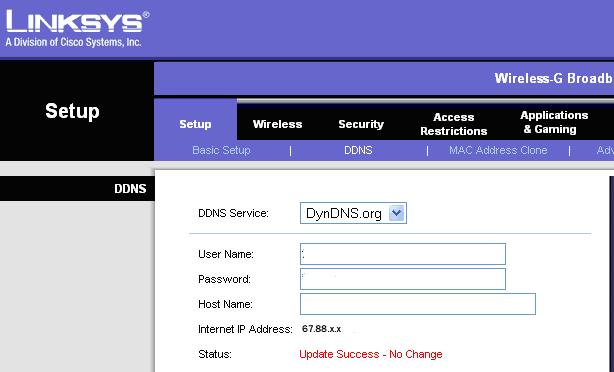
This will maintain your current IP info as a global internet address. When every your IP changes you will need to login into DynDNS and update the IP registed. Newer routers have a Dynamic DNS feature which will let you automatically update DynDNS whenever your IP changes. The other option is to use a DNS Update client that automatically updates your register IP from your PC. These clients are available on the DynDNS site.

Set up your firewall
For this example I am using a Linksys router. If you are using a software firewall like Zone Alarm or anther hardware firewall / router please consult your user manual.
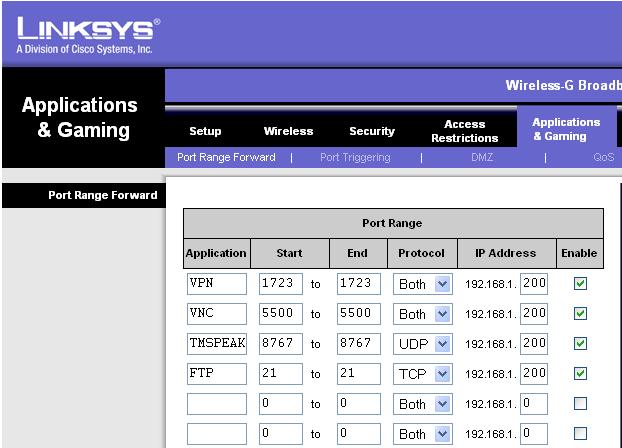
- Login to your router (usually http://192.168.1.1). Click on Applications & Gaming under the Port Range Forward.
On older an older Linksys it would be under Advanced tab then the Forwarding tab. You will see a similar page.

- In the application box put FTP. Put 21 in both the Start and End box. Choose Both for the protocol. For the IP address enter the IP of the computer that you will be using for the FTP Server.
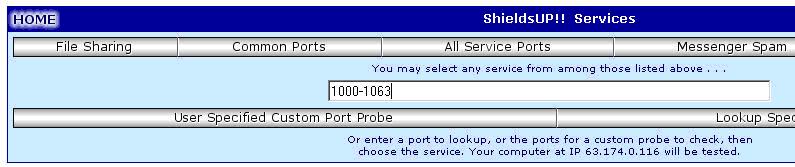
- To check if the port is now open go to go to http://www.grc.com and click on the Shields Up link or click https://grc.com/x/ne.dll?bh0bkyd2 . This will let you scan your router/firewall port from an external source.
- When you get to the Shields Up page, enter 21 in the box and click “User Specified Custom Port Probe. You will also see some other options such as Scan Common Ports and All Service Ports feel free to experiment.

If the ports show up as Stealth then either you mis-configured your router or your ISP is blocking these ports. In most cases, you will see the ports listed as Closed.
If you see ports listed as OPEN this means some service / application responded to the port probe request! You will see how this work later.

Areca Backup Setup
Areca is an open source backup program for windows and linux that allows to easily backup and restore your data. The reason I choose Areca is because it provides the ability to not only backup to local networks but over FTP. Install this software on the computer you want to backup.
- Install Areca Backup
1. Edit – New Group

2. Edit.. New Target…
In the Main section, enter a target name. Choose FTP / FTPS Repository. Leave all other options default. Then click the Select button next to the FTP / FTPS Repository

3. Enter the DynDSN name you choose earlier in this article and enter it in the Remote Host field. Leave the port 21. Enter a backlash (/) for the Remote directory, unless you want the backups to be stored in another directory.
Note: If your ISP blocks incoming port 21 you may need to change the port.

4. Under the Source tab, choose the Directory button

Test Backup

Final Notes:
The reason I used Areca is because it can be configured to use FTP. FTP is well known, and you can setup a folder structure to organize different backups. It can also be setup to use FTPS for secure connection. Using the concepts outlined, you could setup another software to backup over the internet.
[ad#singlepage]
Pingback: EverythingTech » Blog Archive » Backup Types