This is an updated post to my last post Xbox RRoD really Sucks. I did get my Xbox 360 to work after following the i-hacked xbox fix video. This is how I did it.
Open the Xbox 360
Use this guide to open the xbox, http://www.xboxchopshop.com/catalog/man_360_open.php, as mentioned in the i-hacked post.
Notes about opening the Xbox 360: I used a small screwdriver and leverage to pop the tabs in the back of the xbox. You will hear a popping noise when you push on the small tabs. This can be very frustrating to get the cover off. I recommend getting the Xbox 360 Unlock toolkit from www.mod-chip.com for this part and save your sanity.
Materials Needed
- 8 M5-.80 x 10 Machine Screws (Lowes part number: #138433)
- 16 #10 Flat Washers – Nylon (Lowes part number: #139065)
- 16 5mm Flat Washers – Metal (Lowes part number: #13831)
- Torx T10 screw driver
- Torx T8 screw driver
Notes on materials: You can purchase these parts online and save yourself a little headache, but if you are like me and can’t wait I found similar parts at a local hardware store but I did have to make a few modifications which I will talk about later. You can also use 3/16 inch machine screws and the smallest washers that fit on the screws. The M5 screws have a better thread fit than the 3/16 inch however.
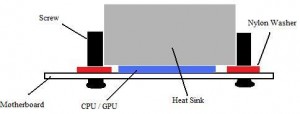
I feel the washers are the most important of this modification. The parts list include metal washers and nylon washers. I have read that the nylon washers are used as insulators to prevent shorting, but I feel all you need is the nylon washers not for insulation but for cushioning. The reason the washers are so important is because they provide the proper spacing between the motherboard and the chips. Improper height of the washers will either prevent the heatsinks from contacting the chips or create the possibility of over-tightening and damaging the chips.
Tip: Place the washer(s) on the motherboard an look to see if the top of the washer lines up with the top of the chip then you will know you have the right height.
Prepare the heat sinks
After you have opened the Xbox 360, removed the motherboard and heat sink X-clamps as depicted in the video, you need to unscrew the bolts off the the heat sink where the X-clamps attached. You will be screwing the machine screws directly into theses screw holes through the motherboard. My screws happen to be a bit longer than the ones in the parts list so I needed to drill through the flat heat sink to get the screw to go in all the way. If you buy the parts from the item list you will not have to do this . If you do, drill the hole from the top instead of through the screw holes to avoid damaging the threads.
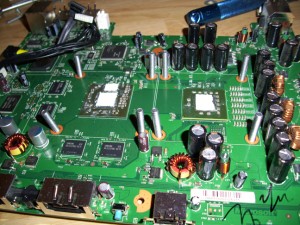 According to the video I put some thermal paste on the chips after cleaning them off. Then with the motherboard on its side so the screws wont fall out, hand screw the bolts into the heatsinks until thy are snug. Do not tighten yet.
Plug the video cable, power cable, and daughter board (the power button ) in and allow the Xbox to overheat. You will see 2 flashing red lights to let you the chips are overheated.
Notes on overheating: If the red lights come on right away and the heat sinks are not really hot, then the heat sinks are not making proper contact with the chips. Either tighten the screws a little more or get the right height washers. It took my xbox about a minute for the 2 red lights to start flashing.
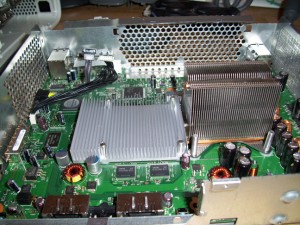 Finally, tighten the screws while the heat sinks are still hot. Be careful not to touch the heatsinks while hot (ouch!). Tighten the screws in a diagonal pattern. For example, tighten the top left screw then the bottom right, then top right, then bottom left.
Final Thoughts
I thought I would never get my Xbox 360 working again, but this fix is relatively easy and is worth a shot. This will void your warranty (if you care) and you might as well mod the Xbox 360 DVD drive to play your backed up games while you have it opened. You need to update the firmware on the DVD drive to play backed up games. Installing the Blaster 360 will be handy so you don’t need to open the Xbox anymore when new firmwares come out.
If this doesn’t work and you are going to buy a new Xbox, make sure you get the extended warranty plan from BestBuy or whatever store you get it from. It paid for itself for me since I had to return my xbox 3 times for RRod.
Update:
Microsoft may have permanently fixed the RRoD problem in new hardware, so you don’t have to be afraid of the RRoD anymore.

Pingback: Xbox RRoD really sucks | EverythingTech
Pingback: No more RRoD for Xbox360 | EverythingTech
Hey guys I need your help. Lowes does not list 8 M5-.80 x 10 Machine Screws (Lowes part number: #138433) online nor in the store. Is there another screw that could be used?
Check your local hardware stores. The mom and pop shops sometimes have what the big guys don’t. That’s where I found mine. You can also go with .5” long 3/16 standard size, but they are not exactly the right thread.
Been playing G.R.A.W. online for about 3 hours now after this fix. I found everything on the list at lowe’s. I tried to fix my rrod in the past with just reseating the heat sinks using arctic silver, but with limited luck. It would usually only last about a week. We’ll see what happens this time.
Hey, nice writeup thanks. So the nylon washers go on the top of hte MB and the metal ones are used for the bottom? Please correct me if I am wrong
The metal washers are not really needed.
Anyone willing to help me with the Machine screws cant find them in my lowe’s. Any type of replacement screws? if you have aim send me a message at phatfarm2k4. Greatly Appreciated
Try Mcmaster Carr they carry every screw you canimagine
Has anyone found this to be a permanent solution?
Did anyone by any chance download the metacafe video that went with this? I watched it once, but now it seems it has been taken down.
Ok so I just fixed my modded first gen 360 loosely following this guide + several others on the web. I used screws bought down at my local Lowe’s along with washers (steel and nylon where applicable) put it back together, worked right away, let the GPU overheat anyway to hopefully fix the broken solder joints, let it cool for half an hour, and its working fine now (seemingly) we shall see in the long run.
I used all the parts listed upabove
8 M5-.80 x 10 Machine Screws (Lowes part number: #138433)
16 #10 Flat Washers – Nylon (Lowes part number: #139065)
16 5mm Flat Washers – Metal (Lowes part number: #138319)
from lowes $6.44, actic silver 5 $10, go-gone$4 TOTAL of $20.44 and it fixed the two flashing red lights code 0013, I first tryed to use the original x-clamps no luck heat sinks to loose. Thanks for the help saved $80.00
Used the fix on my 360 (bought in 2006). It lasted about a week, and then started freezing. I got the E71 and E79 Errors, and then the RRoD again (I know the errors are software errors).
Tried the Fix again to no avail, so im going to buy the EBGames 360 Pack, as it comes with the Elite and supposedly, the new ones are fixed.
Hi,
Great tutorial, I used this and cross referenced a few others. All went to plan apart from switching it back on for the first time (not fully assembled / no air tunnel). I get the Left 2 red lights flashing almost straight away, so it doesn’t give me RROD and then 2 red lights once its over heated.
Any ideas to what I have done wrong? I’m experienced with building pc’s but this is my first time inside the 360.
Thanks in advance
Rob
Sorry to say but this fix only lasted about a week for us also, tryed replacing the compound no luck we saved our hard drive,controler,cables and traded it for a game at our local game store @$40 bucks and bought an arcade.I would have tryed to reflow if I’d known that thy were not going to try it out. How could this fix work for a week and repeat the same steps and not work? same code 0013 played for @ 5-6 minutes then 2 red lights.
Good piece with nice photos. But there are some good products out there that just require some basic household tools to do the red light fix. I certainly know of one that works. See ya later.
Pingback: Daily LifeStream Digest for October 20th | BryanSays.com
I used your method, but have left out the rubber tabs on the chips. So far so good. The system has been running for about an hour now. I also added a 120mm fan to the top of the case over the heat sinks. I used a seperate 12 Volt power supply to run the fan. I also used Artic Silver Thermal Compound which is 150% better than what microsoft uses. I paid special attention to the “height” of the washers for spacing. One plastic washer on the bottom, and two metal washers on the top. Not too much tension on the crews as well. Just enough for chip contact/hand tight +/-. I will continue to test this machine, in hopes your method is a permenant fix. Thank you
Hardware:
4 – 5mm x 10mm Pan Head Machine Screws
4 – 5mm x 16mm Pan Head Machine Screws
8 – Nylon Washers “to fit”
16 – Metal Washers “to fit”
Artic Silver Paste
and most of all:
” Patience”
Good Luck Everyone
Don’t over tighten the screws or the GPU will get crushed. It should make good contact with the heat sink and use lots of thermal paste.
THANK YOU SO MUCH. I used this in conjunction with a vid on youtube and once I finished up the box booted right up for the first time since it froze and the RROD error hit me! My fans are speeding up to max I think unfortunately. I want to find out why. I’m happy though. 20 bucks on the tools and some time is what it cost me to get it running again. God bless all and thanks!
Pingback: Most unreliable console system: Xbox 360 | EverythingTech
Mine was fixed for a while too, but I got the RRoD again. The arcade also has HDMI that my old one didn’t have
fix the rrod but when i turn it on now all it does is boot up and wont show up on the tv screen and wont give me green light for the controllers….. where did i go wrong????anyone know??????
You can also use 10-32 screws.I don’t understand the nylon washer. It was metal to metal anyway.
yes it was metal to metal anyway but the metal to metal from the clamps was not movable/slide. the washers are, nylon will not scratch the board.
use the right screws, “but they are not exactly the right thread.” that is the half @$$ way to do things. spend the extra 5 minutes to get the correct thread m5 .8×10… also a tip: be sure to use some compressed air to clean the dust of the board before putting back together. this will ensure the terminals are not bridged.
I put in the nylon washers and screws into the cpu and new thermal paste and then it worked for about 10 mins then back to 3 red lights again and then it will come on the odd time but then freeze and go to 3 red lights again what went wrong? or do i have to do the gpu aswell ? i cleaned gpu and new thermal paste but used the x clamp back on it
This worked great for me so far, I tried another tut on this and could not get it to work, I then tried this one and on first try red lights were gone. the only difference between this one and the other one I tried was the other one had me drill out holes in the case to run new screws through it, and this one only goes through the mainboard, I hope this holds up for a long time.
to xboxfixer pls help me.i dont have any scew u said,can i put the clamps again after putting d thermal paste.wat do u think does it works?
i’ve tried this technique once on my elite and it worked for about a week. i’ve had to do it again, the layer of thermal was way too thin and the solder joints probably did not go back to peak performance. Here’s a flaw, you cannot guage how much pressure you’re putting on the cpu/gpu when tightening the heat sink in place which in turn can cause way more damage.
i got the fix to work and xbox turns back on with no rings without the DVD drive hooked up. as soon as i reconnect the DVD drive 3 red lights come back on. happens at startup and when i tried hooking up while it was working. anyone know how to fix??!!!
is it nesscessary to use the thermal paste or not using lead to more problems
this mod failed miserbly on my xbox 360. I went from three red light s to two. this means I have hardware failure
wait how long do i leave the xbox to over heat before tightening the screws
just did this last night on my halo 3 edition (suprised it lasted this long) couldnt find the #138433 screws at my local lowes so i substituted #138240, roughly 16 hours of use on it since i put it back together and it’s still working fine.
Hey just finished repairing my xbox 360 3 ring, successfully. Thank you for the great guide and a note to the wise. I got my parts from homeco Ace,which was the best place to go in my town, but before I went I checked the stock at the local Home Depot online, which I recommend shop smarter not harder right. Also this was the first time I have applied thermal paste and if its the same for you beware that stuff gets everywhere, so try your best to localize it to where xbox applied the original paste for better results and clean up the stuff that overflows onto the nearby terminals.
And for the people responding above, it varies on how long it switches from three ring to two ring, it was about 7 minutes for me and if you do not know if you have waited long enough or not just be patient its not like your going to do anymore damage than has already been done.
Hello. Just wanted to say i haven’t done this particular procedure, but i’ve done the youtube/LLama’s fix.. I’ve done three and all three are working great. Lasted longer than a week and my son plays for a while everyday. i even got one for $5 at a yard sale/flea market with power supply and 20 gig HDD. Works great and i think is JTAGable.
The last one i did was an “elite”. I bought it but discovered a first gen heat sink, leading me to believe it was and older board. After I fixed it it showed the serail number does not match the case, so it was swapped. It has HDMI so no matter. I found the x/clamp fix was tried, but the screws were so tight, i needed vice grips to remove them. That is WAY too tight. I put on a fair amount of paste, and hand tightened them +/-. That’s all it takes in my humble experience. Some people say the arctic silver will cause shorts, but the packaging itself says it’s non-conductive.
I then powered up three times, getting three red rings each time, and let it cool about 15-30 minutes in between.
Usually on the fourth time, it boots to the dashboard and you’re off. I test it by playing a movie all day. I also tighten them first, not after heating. Haven’t had a problem yet.
I also didn’t drill through the case on the last two. I didn’t remove the fan shroud, just let it red ring and cool.
I DID put in the 2nd gen heatsink, with the heatpipe, though, for better cooling. Again, in my opinion, the x clamps seem like a good idea and SHOULD work if the paste is re-applied and the connection with the heatsink restored, but since i have them apart, i replace them with screws.
Well, hope this comment helps. I enjoy doing this and if you have any questions there is a lot of help here, on youtube, and if you look up LLAMAs xbox fix, you’ll find a lot. Also, wikipedia has some info too.
Good luck to you all.
I’ve used this method with the tools described a bunch of times and it works good generally. Some instances last longer than others but, it seems to be a long-term fix more often than not. @Allen, 2 lights is overheat, not hardware failure. that’s what the rrod is described as. You should stick to this guide, splurge on the arctic silver and gradually tighten the screws until the light turns green. Save yourself a lot of headache and don’t reassemble your “X” until the red lights are gone. You MUST use the thermal paste and get rid of those stupid X-clamps. Lowes has everything in my experience, and you can get away with using cheap paste if you really slather it on. Stick with it and you’ll be playing games in no time, though I can’t guarantee for how long. Thanks for the guide.
-Flexx
p.s. Stop being dummies you guys, its not rocket surgery.
WOW! this actually worked. I bought the same exact parts as listed above from Lowes (x2 as needed, im going to do this on an elite)
Bought Antec 7 thermal paste from Staples and coated a decent amount on it. Then used 2nylon washers per bolt and did exactly what he instructed.
After it overheated I tightend the screws while powered on as instructed and then unpluged the power and put the Xbox Mobo in the freezer for ten min, took it out then let sit for 5 min…powered right on normally. Tightend the bolts a little more and WaL’Ah’!!!
Will Note If the RROD comes back, Todays date is Sept 19 2011
ETA OF REPAIR: 2hrs
Thanks DaFixer
Hi guys, i opened.my xbox 360 because of the rrods but i noticed that my gpu or cpu are way different than the pics above.. Can anyone help me? Thank you
I just tried this and it seems to be working fine. I just used one plastic washer on the bottom and on the top I used one plastic then the metal washer to even out the heat sinks on top of the processor.
got the screws and washer parts from lowes and some of them are different numbers than listed above, so go off the measurements. I bought the artic thermal paste at a computer store.
I turned the screws just tight enough to be snug with pliers. Also to hold the screws in while you put the heat sink I used tape for each one separately.
turned it on it had rrod then let it run for about 15min. shut off for 15 and its working…
Thanks!!!
hopefully this fix will last.